Resources Editor: Difference between revisions
No edit summary |
|||
| Line 33: | Line 33: | ||
A user can give their resource membership to a group by utilizing the drop down menu under the "Group Memberships" label. This drop down menu can be used to select an existing group. Once a group is selected press the "Add" button to give your resource membership to the group. It will then be added to the list of memberships. Alternatively instead of pressing "Add" a user can select a group and press "Edit" this will allow them to rename the group. Finally if a user wishes to add a new group that is not already included in the drop down menu press "New". This will open up a pop up window that will prompt the user to create one. | A user can give their resource membership to a group by utilizing the drop down menu under the "Group Memberships" label. This drop down menu can be used to select an existing group. Once a group is selected press the "Add" button to give your resource membership to the group. It will then be added to the list of memberships. Alternatively instead of pressing "Add" a user can select a group and press "Edit" this will allow them to rename the group. Finally if a user wishes to add a new group that is not already included in the drop down menu press "New". This will open up a pop up window that will prompt the user to create one. | ||
==Mixes== | ==Mixes== | ||
Revision as of 20:58, February 21, 2012
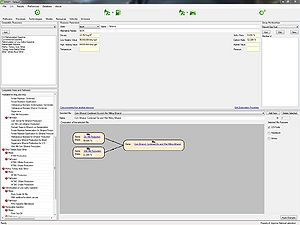
The resources editor is available from the Data Editor. It can be accessed by opening the Data Editor, pressing "Resource", and by selecting either "Add Resource" or "Modify Existing Resource". The purpose of this editor is to adjust the physical properties of a Resource, adjust the mix options of a resource, and edit its memberships. The operation of this editor can be divided into 5 subcategories: Resource Parameters, Compatible Resources, Group Memberships, Compatible Mixes & Pathways, and the Mix Editor.
Resource Parameters
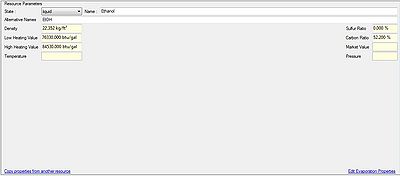
This portion of the editor is where a user can adjust the physical properties and name of a Resource. It is pretty self explanatory. Simply click on the text box corresponding to the physical property you wish to edit, and type in its value. If for any reason the data you are entering is in a different unit right click on the text box and click "Change Unit". This will allow you to change the functional unit to one that is convenient for you.
On the bottom of this user control are two links. They are "Copy Properties from Another Resource" and "Edit Evaporation Properties"
The first link will allow you to copy the physical properties of an already existing Resource. Upon clicking it a user will be presented a new window displaying all the Resources in Greet. Select one by double clicking it to have that resources physical properties inputted for your Resource.
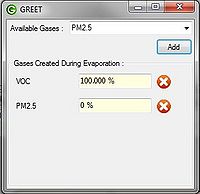
The second link will allow a user to adjust the evaporation properties of the resource. Upon clicking the link the user will be presented with a pop up window where evaporation properties can be adjusted. This window is shown on the right.
The operation of the Evaporation Properties window is quite straight forward. Select a Gas from the drop down menu adjacent to the "Available Gas:" label. Press the "Add" button. This will add it to the list. Then adjust the percentage associated with the newly added gas. For example if VOC was added, and its percent was adjusted to 100% this means that for every 1g of your Resource that is consumed 1g of VOC is emitted.
Compatible Resources
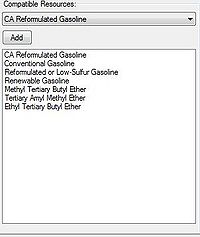
The compatible resources pane shown on the right allows a user to configure the resources that are compatible with the current resource being edited. By making a material "compatible" a user is indicating that it can be used in the mix for the material.
For example let us say a user is creating Reformulated Gasoline as a resource. Under compatible resources the user can add gasoline additives like MTBE and ETBE. That way when designing the mix of this resource they can incorporate these.
Group Memberships
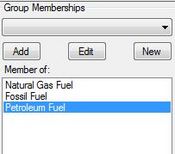
A screenshot of the Group Memberships control can be seen on the left. Memberships are a way to organize Resources. For example Natural Gas, Residual Oil, and Gasoline can be categorized into a group called Petroleum Fuel. It is not necessary give a Resource a membership to a group, but it for data organizational purposes the option is available.
A user can give their resource membership to a group by utilizing the drop down menu under the "Group Memberships" label. This drop down menu can be used to select an existing group. Once a group is selected press the "Add" button to give your resource membership to the group. It will then be added to the list of memberships. Alternatively instead of pressing "Add" a user can select a group and press "Edit" this will allow them to rename the group. Finally if a user wishes to add a new group that is not already included in the drop down menu press "New". This will open up a pop up window that will prompt the user to create one.
Mixes
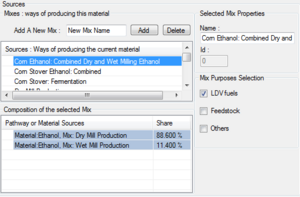
Sources are a concept that was introduced to replace the "combined" sections that are actually in GREET Excel. The general concept in GREET.net is to create a resource, and then declare how this resource is obtained or produced. Primary resources are not defining how they are obtained, because we just take them from our environment i.e. Natural Gas, Crude Oil, Sun light, Wind Power,... all those primary sources are what we are trying to account for. The other resources such as Ethanol or Gasoline needs pathways to be produced, and there are many of them. So in order to be specific and declare how a material like Ethanol is produced we define multiple "Sources" for it. A source is usually an aggregation of one or more pathways.
The screenshot on the right details some of the sources for ethanol. From the top to the bottom we can see "Corn Ethanol : Combined Dry and Wet...", "Wet mill production", "Dry mill production" ... those are sources. Organized as branches of these sources names, we can see some green and purples lines. The green lines are representing pathways. So for now we can see that if we want to use ethanol in our car, and specify that we want to use the source "Wet Mill Production", all the ethanol we're going to get in our car is coming 100% from the pathway named "Wet Mill Corn Ethanol Production". If we choose to use the ethanol from the source "Corn Ethanol : Combined Dry and Wet..." in our car, we can see that our ethanol is coming from two different places, which are purple, they are other sources. In fact we can combined multiple sources under another source, here to create a combined production.
In order to add more sources you can create one by clicking the button "Add". Then some pathways can be drag and dropped over it from the left column, or some sources can be drag and dropped from the right column. Only the compatible materials are shown so whatever is dropped will be compatible for the calculations.
To delete a source, just select it and press the Del key on your keyboard, or right click and delete, or press the Del button
Mix Purposes
The mix Purposes are just a way to organize a Mixes. That way in the Well to Pump Setup view, or the Well to Pump Results