HPC/Network Access/PuTTY Configuration/The Carbon login nodes: Difference between revisions
< HPC | Network Access | PuTTY Configuration
Jump to navigation
Jump to search
mNo edit summary |
|||
| Line 1: | Line 1: | ||
== Configuration for interactive access == | == Configuration for interactive access == | ||
# In the main PuTTY Configuration window, click Session at the top of the tree on the left. | # In the main PuTTY Configuration window, click Session at the top of the tree on the left. | ||
# Select the ''' | # Select the '''Default Settings''' session and push Load. This session will be the basis for the next steps. | ||
#: [[Image:HPC 2012-08 PuTTY config | #: [[Image:HPC 2012-08 PuTTY config 2a load default.png]] | ||
# Click Data in the tree. | |||
# Enter your Argonne '''username''' in the Auto-login username field within the Login details section of the panel. (This step matches the one from your Mega session.) | |||
#: [[Image:HPC 2012-08 PuTTY config 3 username.png]] | |||
# Click "+" in front of SSH in the tree. | # Click "+" in front of SSH in the tree. | ||
# Click X11 in the tree. | # Click X11 in the tree. | ||
#* Click the checkbox '''Enable X11 forwarding'''. | #* Click the checkbox '''Enable X11 forwarding'''. | ||
| Line 27: | Line 24: | ||
# Select the '''Clogin''' session and push Load. | # Select the '''Clogin''' session and push Load. | ||
#: [[Image:HPC 2012-08 PuTTY config 11 load clogin.png]][[Image:HPC 2012-08 PuTTY config 12 loaded clogin.png]] | #: [[Image:HPC 2012-08 PuTTY config 11 load clogin.png]][[Image:HPC 2012-08 PuTTY config 12 loaded clogin.png]] | ||
# Verify that the name "localhost" appeared in the Host Name field above. | # Verify that the name "localhost" appeared in the Host Name field above. Go back to step 1 if it does not. | ||
# Click "+" in front of SSH in the tree. | # Click "+" in front of SSH in the tree. | ||
# Click Tunnels. | # Click Tunnels. | ||
# If your session has existing tunnels and you wish to start over: | |||
#* Select each existing entry in the "Forwarded ports:" field and push Remove. | |||
#* No forwarded ports should remain at this point. | |||
#: [[Image:HPC 2012-08 PuTTY config 5 tunnels remove.png]][[Image:HPC 2012-08 PuTTY config 6 tunnels clean.png]] | |||
=== Add tunnels for VNL === | === Add tunnels for VNL === | ||
Revision as of 22:59, August 29, 2012
Configuration for interactive access
- In the main PuTTY Configuration window, click Session at the top of the tree on the left.
- Select the Default Settings session and push Load. This session will be the basis for the next steps.
- Click Data in the tree.
- Enter your Argonne username in the Auto-login username field within the Login details section of the panel. (This step matches the one from your Mega session.)
- Click "+" in front of SSH in the tree.
- Click X11 in the tree.
- Click the checkbox Enable X11 forwarding.
- Set X display location to :0
- Scroll to the top of the tree and click Session. Enter the host details:
- Host name: localhost
- Port: 33301 (referring to the tunnel set up above as L33301.)
- Protocol: SSH (leave at the default).
- In the Saved Sessions field, enter Clogin
- Push Save. The entry will appear in the list of saved sessions.


To use licensed applications remotely
Begin adding tunnels
- In the main PuTTY Configuration window, click Session at the top of the tree on the left.
- Select the Clogin session and push Load.
- Verify that the name "localhost" appeared in the Host Name field above. Go back to step 1 if it does not.
- Click "+" in front of SSH in the tree.
- Click Tunnels.
- If your session has existing tunnels and you wish to start over:
- Select each existing entry in the "Forwarded ports:" field and push Remove.
- No forwarded ports should remain at this point.


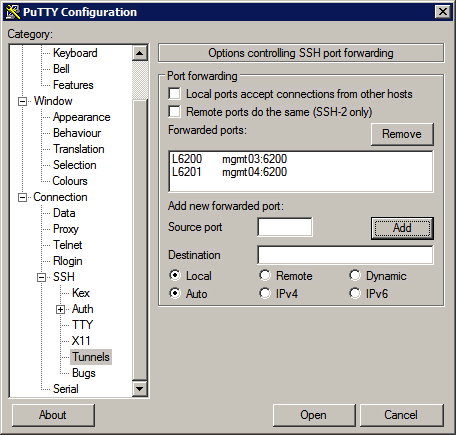
Add tunnels for VNL
- Under Add new forwarded port, enter:
- Source port: 6200
- Destination: mgmt03:6200
- Push Add.
- Repeat with the following settings:
- Source port: 6201 (not 6200!)
- Destination: mgmt04:6200
- Push Add.
- You should now see these two entries:
- L6200 mgmt03:6200
- L6201 mgmt04:6200


Add tunnels for COMSOL
Follow steps similar to VNL shown above. Use the following port numbers and host names:
| Source Port | Destination | Options |
|---|---|---|
| 1719 | mgmt03:1719 | Local, Auto |
| 33317 | mgmt03:1718 | Local, Auto |
| 33318 | mgmt04:1718 | Local, Auto |
| 33319 | sched1:1718 | Local, Auto |
- Because no port number is the same between VNL and COMSOL, their tunnel configurations can coexist.
Finish adding tunnels
- Scroll to the top of the tree and click Session.
- Verify that "Clogin" shows in the Saved Sessions field. If it does not, go back to section #Begin adding tunnels.
- Push Save.