HPC/Network Access/PuTTY Configuration/Accessing Carbon licenses remotely: Difference between revisions
m (→Overview) |
mNo edit summary |
||
| Line 37: | Line 37: | ||
* Keep the default options '''Local, Auto''' for all tunnels. | * Keep the default options '''Local, Auto''' for all tunnels. | ||
'''Important:''' | '''Important:''' You may need to configure the application itself and tell it to use <code>localhost</code> as the license server, and the Source Port shown in the table. | ||
Repeat if there is more than one entry. | |||
Find links to application-specific instructions in the table. | |||
== Begin adding tunnels == | == Begin adding tunnels == | ||
Revision as of 13:02, August 30, 2012
Overview
| Source Port | Destination |
|---|---|
| VNL | |
| 6200 | mgmt03:6200 |
| 6201 | mgmt04:6200 |
| COMSOL | |
| 1719 | mgmt03:1719 |
| 33317 | mgmt03:1718 |
| 33318 | mgmt04:1718 |
| 33319 | sched1:1718 |
| Mathematica | |
| TBD | |
Carbon hosts floating network licenses for several applications. The applications are intended to be run on the compute nodes for compute jobs, or interactively on login nodes for purposes of pre-run preparations or post-run analysis and visualization. The latter will require the use of remote graphics which can be impracticably slow. In these cases, it may be more practical to run the application natively on your machine, foregoing the need to push graphics data over the network. If the application requires a license and you do not have one yourself, you need to configure the application on your machine to access Carbon's license servers. The concept you will use is called port forwarding or tunneling. It works by making a port on your machine act like a port on one of Carbon's hosts.
The table on the right lists port numbers for your system and the matching host:port destinations on Carbon.
- Tunnel configurations for several applications can coexist as long as Source Port numbers do not overlap.
- Keep the default options Local, Auto for all tunnels.
Important: You may need to configure the application itself and tell it to use localhost as the license server, and the Source Port shown in the table.
Repeat if there is more than one entry.
Find links to application-specific instructions in the table.
Begin adding tunnels
- In the main PuTTY Configuration window, click Session at the top of the tree on the left.
- Select the Clogin session and push Load.
- Verify that the name "localhost" appeared in the Host Name field above. Go back to step 1 if it does not.
- Click "+" in front of SSH in the tree.
- Click Tunnels.
- If your session has existing tunnels and you wish to start over:
- Select each existing entry in the "Forwarded ports:" field and push Remove.
- No forwarded ports should remain at this point.


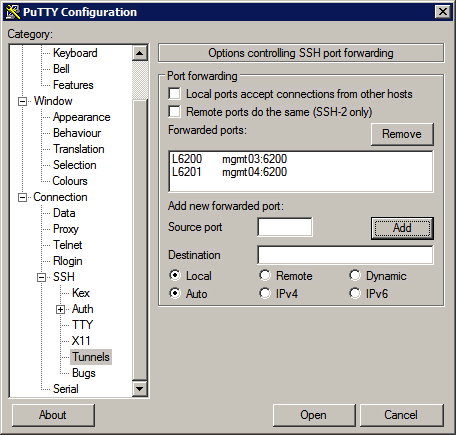
Add tunnels for VNL
- Under Add new forwarded port, enter:
- Source port: 6200
- Destination: mgmt03:6200
- Push Add.
- Repeat with the following settings:
- Source port: 6201 (not 6200!)
- Destination: mgmt04:6200
- Push Add.
- You should now see these two entries:
- L6200 mgmt03:6200
- L6201 mgmt04:6200


Finish adding tunnels
- Scroll to the top of the tree and click Session.
- Verify that "Clogin" shows in the Saved Sessions field. If it does not, go back to section #Begin adding tunnels.
- Push Save.