HPC/Network Access/PuTTY Configuration/The SSH Gateway: Difference between revisions
< HPC | Network Access | PuTTY Configuration
Jump to navigation
Jump to search
m (migrated from top) |
mNo edit summary |
||
| (6 intermediate revisions by the same user not shown) | |||
| Line 1: | Line 1: | ||
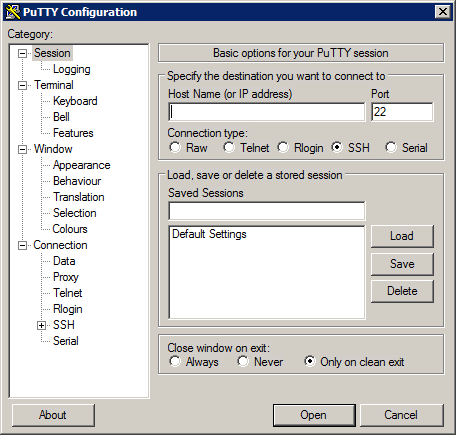
# Open PuTTY. The PuTTY Configuration window will appear. | # Open PuTTY. The PuTTY Configuration window will appear. | ||
#: [[Image:HPC 2012-08 PuTTY config 1 new.png]] | #: [[Image:HPC 2012-08 PuTTY config 1 new.png]] | ||
#: There are many configuration panels that will appear in the main part of the window. The panels are organized as a tree, shown in the left-hand side of the window. Each panel can be | #: There are many configuration panels that will appear in the main part of the window on the right-hand side. The panels are organized as a tree, shown in the left-hand side of the window. Each panel can be reached by clicking on the leaf names of the tree. | ||
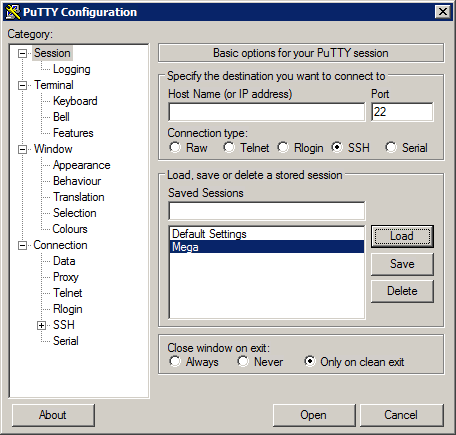
# If you already have a session named '''Mega''' shown in the bottom right list of the main panel, push the Load button. | # If you already have a session named '''Mega''' shown in the bottom right list of the main panel, push the Load button. | ||
#: [[Image:HPC 2012-08 PuTTY config 2 present.png]] | #: [[Image:HPC 2012-08 PuTTY config 2 present.png]] | ||
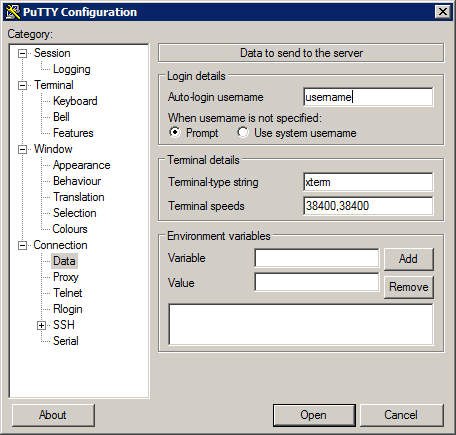
# Click Data in the tree | # Click Data in the tree. | ||
# | # Enter your Argonne '''username''' in the Auto-login username field within the Login details section of the panel. | ||
#: [[Image:HPC 2012-08 PuTTY config 3 username.png]] | #: [[Image:HPC 2012-08 PuTTY config 3 username.png]] | ||
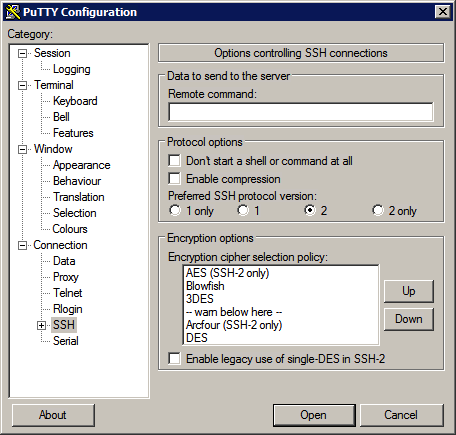
# Click SSH in the tree | # Click SSH in the tree. | ||
# Click the checkbox '''Don't start a shell or command at all''' in the Protocol options section. | # <strike>Click the checkbox '''Don't start a shell or command at all''' in the Protocol options section.</strike> – Update: Leave unchecked. | ||
#: [[Image:HPC 2012-08 PuTTY config 4a command.png]] | #: [[Image:HPC 2012-08 PuTTY config 4a command.png]] | ||
# Click the "+" symbol near SSH to open its sub-tree. | # Click the "+" symbol near SSH to open its sub-tree. | ||
| Line 18: | Line 18: | ||
#*: The letter "L" denotes a port on the local host. | #*: The letter "L" denotes a port on the local host. | ||
#: [[Image:HPC 2012-08 PuTTY config 4 tunnels new.png]][[Image:HPC 2012-08 PuTTY config 5 tunnels mega.png]] | #: [[Image:HPC 2012-08 PuTTY config 4 tunnels new.png]][[Image:HPC 2012-08 PuTTY config 5 tunnels mega.png]] | ||
# '''Updated 2013-02-05:''' To reach specific login nodes, repeat the previous step with these settings: | |||
#* Source port: '''33305''' | |||
#* Destination: '''clogin5:22''' | |||
#: and | |||
#* Source port: '''33306''' | |||
#* Destination: '''clogin6:22''' | |||
# Scroll to the top of the tree and click Session. Enter the host details: | # Scroll to the top of the tree and click Session. Enter the host details: | ||
#* Host name: '''mega.cnm.anl.gov''' | #* Host name: '''mega.cnm.anl.gov''' | ||
Latest revision as of 04:33, October 23, 2020
- Open PuTTY. The PuTTY Configuration window will appear.
- If you already have a session named Mega shown in the bottom right list of the main panel, push the Load button.
- Click Data in the tree.
- Enter your Argonne username in the Auto-login username field within the Login details section of the panel.
- Click SSH in the tree.
Click the checkbox Don't start a shell or command at all in the Protocol options section.– Update: Leave unchecked.- Click the "+" symbol near SSH to open its sub-tree.
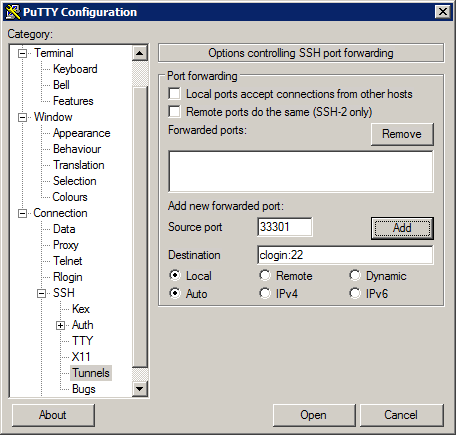
- Click Tunnels. Under Add new forwarded port, enter:
- Source port: 33301
- Destination: clogin:22
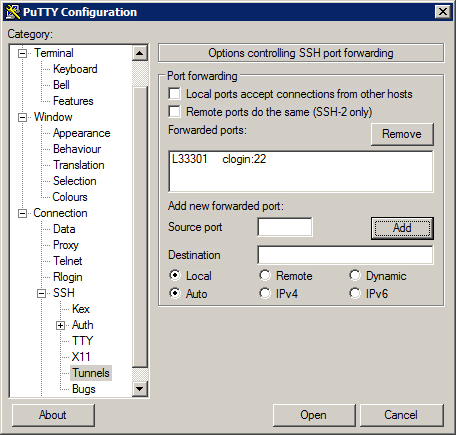
- Push the Add button. A new entry will appear in the middle field, shown as:
- L33301 clogin:22
- The letter "L" denotes a port on the local host.
- Updated 2013-02-05: To reach specific login nodes, repeat the previous step with these settings:
- Source port: 33305
- Destination: clogin5:22
- and
- Source port: 33306
- Destination: clogin6:22
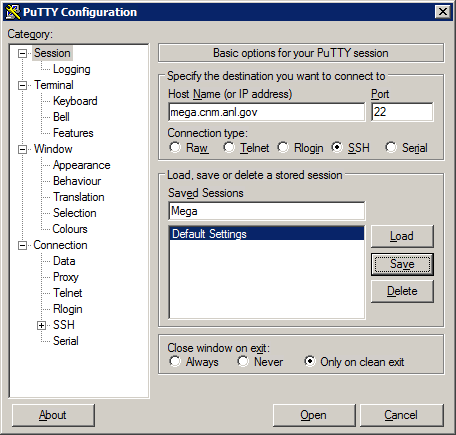
- Scroll to the top of the tree and click Session. Enter the host details:
- Host name: mega.cnm.anl.gov
- Port: 22 (leave at the default).
- Protocol: SSH (leave at the default).
- In the Saved Sessions field, enter Mega
- Push Save. The entry will appear in the list of saved sessions.
