HPC/Applications/lumerical: Difference between revisions
| (138 intermediate revisions by the same user not shown) | |||
| Line 1: | Line 1: | ||
==Introduction == | ==Introduction == | ||
Lumerical | Lumerical consists of several applications, the most popular being FDTD Solutions to perform photonics modeling. Others are Multiphysics (formerly DEVICE), MODE, and INTERCONNECT. | ||
* ''' | |||
* ''' | The applications typically have two primary components. | ||
* A ''design'' application (GUI). These are licensed by user. | |||
* A ''solver'', or engine, licensed by compute job. | |||
Lumerical was originally produced by Lumerical, Inc., which has been acquired by Ansys in 2020. | |||
, | Ansys introduced major changes to the Lumerical licensing engine and terms, | ||
notably limiting user eligibility and reducing concurrent capabilities of solvers. | |||
=== Access === | |||
Access to '''Lumerical''' is limited to Argonne staff who are CNM users, and to CNM staff. | |||
To request access, [mailto:[email protected]?subject=CNM%20Lumerical%20access%20request'''submit a support request''']. | |||
== Manual and Knowledge Base == | == Manual and Knowledge Base == | ||
https://kb.lumerical.com/ | |||
== | == Ways to run Lumerical GUI applications == | ||
The Lumerical applications, both GUI and compute engines, can be run on any desktop or laptop computer, and on our HPC cluster, ''Carbon''. | |||
In every situation, the application requires network access to a Lumerical license service running on ''Carbon''. | |||
For the '''GUI applications,''' there are three ways to run: | |||
# Run on your desktop or laptop directly and use [[#Configuring license access when not running on Carbon directly|license port forwarding.]] For versions 2021 and later, this is possible on Linux or Windows only, because ANSYS decided to no longer offer macOS packages. | |||
# Run on ''Carbon'' and display on your machine over [[HPC/Network Access/SSH Tunnel Setup on Linux and MacOS|X11 forwarding]] | |||
# Run on ''Carbon'' in a [[HPC/Network Access/Virtual Desktop|VNC virtual desktop]] and display that desktop on your machine. | |||
Here are considerations to help you choose: | |||
=== Directly on your computer – for Windows/Linux only === | |||
Run any Lumerical application directly, or ''natively'' on your Windows or Linux machine; Macs are not supported from 2021 on. | |||
The application needs to be installed on your machine and be configured to obtain the Lumerical license over the network from ''Carbon''. | |||
* Advantage: Native graphics speed. | |||
* Caveat: When running outside of CNM (which is possible), you will need an active network connection to NST. | |||
To get started: | |||
* You will need to have the Lumerical software ''installed'' on your desktop or laptop. | |||
** For an Argonne-owned machine, [mailto:[email protected]?Subject=Install%20Lumerical-FDTD submit an IT support request] to have the software installed. | |||
** For your own machine, you must have Lumerical binaries installed yourself, either through your home institution or by stepping up from a trial version. | |||
* In the application, configure license access as shown below. | |||
=== X11 === | === On ''Carbon'', over X11 – for Windows/Linux/Mac === | ||
Run a Lumerical GUI application on a ''Carbon'' login node, and have its windows appear on your screen using the X Window system | |||
fdtd-solutions & | |||
* Requires an X11 server application on your desktop machine. | |||
* Requires X11 forwarding under SSH. | * Requires X11 forwarding under SSH. | ||
* Disadvantage: May run | * Advantage: Runs with its own windows, has basic Copy&Paste support. | ||
* Disadvantage: May run sluggish. | |||
=== VNC === | === On ''Carbon'', over VNC – for Windows/Linux/Mac === | ||
Run a Lumerical GUI application on ''Carbon'' in a [[HPC/Network Access/Virtual Desktop|VNC virtual desktop]], and view this virtual desktop on your machine. | |||
* Requires a VNC client on your side. | * Requires a VNC client on your side. | ||
* Advantage: uses compression and hence can be faster than X11. | * Advantage: uses compression and hence can be faster than X11. | ||
* Disadvantage: Limited desktop environment. | * Disadvantage: Limited desktop environment, Copy&Paste support depends on VNC viewer client. | ||
=== | == Ways to run Lumerical compute engine applications == | ||
Run | For the '''compute engine''', there are two distinct ways to run: | ||
* | |||
* | === Running within the GUI application === | ||
Select this means when you expect the compute task to complete relatively quickly – say, up to an hour or so, or however long you can tolerate to dedicate CPU on your machine. | |||
# Push the "Run" button in the GUI. | |||
# Wait for the result. | |||
# Analyze results in the GUI. | |||
=== Running as a batch job on ''Carbon'' === | |||
Select this means when the compute task runs for a longer time, or you have many compute tasks, in particular when you run a "parameter sweep". Running a sweep on ''Carbon'' allows you to process the grid points of your parameter mesh in parallel over the CPUs on one compute node or even on several compute nodes. | |||
To run a batch job: | |||
# Design and your model in the GUI. | |||
# Place "monitors" as you need. | |||
# For a parameter sweep: define your parameter grid, i.e., the variables, search intervals, and number of variable steps. | |||
# Save the model as <code>*.fsp</code> file. | |||
# Transfer the file to ''Carbon'' (if you did the above steps on your machine). | |||
# Copy and adapt one of the ''Carbon'' Lumerical job templates for your model. | |||
# Submit the job. | |||
# Await job completion, either by inspection, or by receiving a job completion mail. | |||
# Transfer any updated <code>*.fsp</code> files back from ''Carbon'' to your machine, if so desired, for analysis there. | |||
== Configuring license access when not running on Carbon directly == | |||
To use the [[#Native]] Lumerical applications on your computer, as opposed to running on Carbon over a graphical connection, the following conditions must be met: | |||
* Your computer must be able to reach the Carbon license server, at least while you run any of the Lumerical applications. | |||
* Your Lumerical suite must be configured to use those license servers. | |||
The specific configuration steps depend on the network location of your computer, as follows: | |||
=== When inside CNM or using VPN as a CNM staff member or postdoc === | |||
'''Reminder:''' Licensing for all Lumerical applications running on Carbon itself (i.e., as started on a login node or by a batch job) are pre-configured, so none of the following applies there. | |||
On your desktop or laptop, do the following: | |||
The | [[Image:HPC 2019-04-12 Carbon reachability.png|right|350px]] | ||
# Verify that your computer is connected inside of CNM's network, by one of the following: | |||
#:* a ''wired connection'' in a CNM building (440, 441), or | |||
#:* over ''Argonne-auth WiFi'' in the same building, or | |||
#:* over ''Argonne VPN'', established as a ''CNM staff'' user. | |||
#: A connection over the Argonne-guest WiFi network or over VPN as a user of another division will not suffice. | |||
# In a web browser open the following URL '''exactly as shown''', i.e., having a bare hostname without dots: | |||
#*:'''http://carbonmgmt/''' | |||
#* If you get a status page mentioning "Carbon", your configuration is OK. Proceed to step 2. | |||
#* Otherwise, you will see an error message similar to "server cannot be found". Proceed as follows: | |||
#: '''Example for mac OS''' [[Image:HPC 2020-11-05 mac VPN DNS.png|right|350px]] | |||
#:* Open your computer's "Network" configuration settings. | |||
#:* Select the "VPN" configuration profile. | |||
#:* If needed, unlock the panel to make changes. You may need to have administrator privileges to do so. Request assistance if needed. | |||
#:* push the "Advanced…" button. | |||
#:* Locate the tab or section for DNS configuration. | |||
#:* Add <code>cnm.anl.gov</code> as a DNS Search Domain and apply the settings. | |||
#:* Retry the link above. | |||
#: '''Explanation:''' There are two reasons for the steps above: | |||
## Accommodate both <code>nst.anl.gov</code> and <code>cnm.anl.gov</code> as domain names. Carbon-based license services use only the latter. | |||
## Accommodate license access from both inside and outside of the Carbon cluster. | |||
# Start the '''License Configure''' or simply the main '''FDTD Solutions''' application on your machine. | |||
#* '''Note:''' You may see a window with title "Getting Started" containing a notice titled "Blocked by Outdated Software" from Argonne's Cyber Security Program Office. You may safely close the window. The notice appears because the window is a web page that is rendered by an often older browser engine compiled-in to FDTD. | |||
# If you started '''FDTD Solutions''', locate the Configure License menu item, either in the application or Help menu. | |||
# Choose the tab "Floating" in the Configure License window. | |||
#* Activate the checkbox: Configure redundant servers. | |||
#* Set the Server entries to <code>clicense1</code>, <code>clicense2</code>, and <code>clicense3</code>, exactly as shown, ''without'' a domain name part. | |||
# If you used the License Configure app, close it, and start the main '''FDTD Solutions''' application. | |||
# In FDTD, choose About FDTD Solutions. | |||
=== | ==== Check license access configuration ==== | ||
License settings change across releases. For reference on recent versions, see the panels below. | |||
<!-- [[Image:HPC 2019-04-12 Lumerical Floating setup inside.png|350px]] [[Image:HPC 2014-07-31 Lumerical 3 server About.png|600px]] --> | |||
<!--[[Image:HPC 2022-08-23 Lumerical ANSYS setup inside.png|350px|thumb|License config 2022]] | |||
[[Image:HPC 2023-08-22 Lumerical License config 2023 R2.png|350px|thumb|License config 2023]] | |||
//--> | |||
<gallery> | |||
File:HPC 2022-08-23 Lumerical ANSYS setup inside.png|350px|thumb|License config 2022 | |||
File:HPC 2023-08-22 Lumerical License config 2023 R2.png|350px|thumb|License config 2023 | |||
</gallery> | |||
==== | ==== Note on Web blocking ==== | ||
[[Image:HPC 2019-04-12 Argonne Network Blocking in FDTD.png|right|350px]] | |||
; Problem: | |||
For the About Lumerical menu item, instead of proper license information, an Argonne network blocking page may appear when using an older (or even not-so old) version of FDTD. | |||
This is due to Lumerical using a built-in web browser engine that may be considered outdated by Argonne's network security configuration. | |||
; Workaround: Close the About window and work normally. Normal operation should not be affected by the blocking. | |||
=== When outside CNM === | |||
# Close any connection to Carbon's login nodes. | # Close any connection to Carbon's login nodes, and Mega. | ||
# | # Revisit the port forwarding configuration for your your SSH client (one-time only). | ||
::* Mac and Linux users: Add to [[HPC/Network Access/SSH Tunnel Setup on Linux and MacOS#Configure_~/.ssh/config | ~/.ssh/config]]: | ::* Mac and Linux users: Add to [[HPC/Network Access/SSH Tunnel Setup on Linux and MacOS#Configure_~/.ssh/config | ~/.ssh/config]], in the section for mega: | ||
<syntaxhighlight lang="bash"> | <syntaxhighlight lang="bash"> | ||
… | Host mega | ||
… | |||
# ANSYS-LM at former Lumerical-LM | |||
LocalForward 1055 clicense1:1055 | |||
LocalForward 27011 clicense1:27011 | |||
</syntaxhighlight> | </syntaxhighlight> | ||
<!-- Not used, despite firewall mention at https://optics.ansys.com/hc/en-us/articles/4660658639251-Ansys-license-manager-configuration-and-license-file-installation: | |||
LocalForward 2325 clicense1:2325 | |||
--> | |||
::* Windows users: See [[HPC/Network Access/PuTTY Configuration/Accessing Carbon licenses remotely]] | ::* Windows users: See [[HPC/Network Access/PuTTY Configuration/Accessing Carbon licenses remotely]] | ||
<ol start="3"> | <ol start="3"> <!-- Need native HTML since MediaWiki syntax breaks after syntaxhighlight --> | ||
<li> Log in to clogin using ssh (each time): This will activate the forwarded ports configured in the previous step. | <!-- <li> Log in to clogin using ssh (each time): This will activate the forwarded ports configured in the previous step. --> | ||
<li> Install or upgrade Lumerical. | <li> Re-open the connection to Mega. | ||
<li> Install or upgrade the Lumerical application | |||
<li> Open Lumerical as usual. | |||
<li> Select the "Licenses" menu item. | |||
<li> Open the "Floating" tab. | |||
Enter the host IP address as follows: | |||
:[[Image:HPC 2013-07-24 Lumerical FlexNet client setup.png|350px]] | :[[Image:HPC 2013-07-24 Lumerical FlexNet client setup.png|350px]] | ||
: '''Note:''' ''Do not use "localhost"'' - this is ambiguous when IPv6 is in play. | |||
<li> Push "Apply". | |||
<li> Start Lumerical.: To inspect the license setting, choose About Lumerical from the application menu. | <li> Start Lumerical.: To inspect the license setting, choose About Lumerical from the application menu. | ||
</ol> | </ol> | ||
=== File-based license configuration (advanced) === | |||
<!-- | |||
On Mac and Linux platforms Lumerical stores its license settings ''alongside other applications that use FlexLM'' in the file <code>.flexlmrc</code> in your home directory. | |||
The entry for Lumerical should read as follows: | |||
; When onsite or while connected over VPN: | |||
<source lang="bash"> | |||
… | |||
LUMERICL_LICENSE_FILE=27011@clicense1,27011@clicense2,27011@clicense3 | |||
… | |||
</source> | |||
; When accessing the license via an SSH tunnel: | |||
<source lang="bash"> | |||
… | |||
… | |||
</source> | |||
; Notes: | |||
According to [https://www.mathworks.com/matlabcentral/answers/88-where-does-matlab-look-for-licenses an older MATLAB support answer], the '''full search order''' by FLEXlm clients for license files or license servers is as follows, with checkouts being made from the first source available: | |||
# Command line option. | |||
# Environment variables <code>''VENDORDAEMON''_LICENSE_FILE</code> or <code>LM_LICENSE_FILE</code> (not used by ''Carbon'' modulefiles, because it is difficult to tweak administratively, especially in long-running shell sessions.) | |||
# User-owned storage, under naming determined by FLEXlm client library: | |||
#* Mac/Linux: <code>~/.flexlmrc</code> | |||
#* Windows: Registry keys: | |||
#: <code>HKEY_LOCAL_MACHINE\Software\FLEXlm License Manager\''VENDORDAEMON''_LICENSE_FILE</code> | |||
#: <code>HKEY_LOCAL_MACHINE\Software\FLEXlm License Manager\LM_LICENSE_FILE</code> | |||
# User-owned storage, under naming determined by the application: | |||
#* Mac/Linux: <code>~/.''vendorname''/''appver''_licenses/{license.dat,*.lic}</code> | |||
#* Windows: <code>$APPDATA\''VENDORNAME''\''APPNAME''\''APPVER''_licenses\{license.dat,*.lic}</code> | |||
#: where <code>$APPDATA = %APPDATA%</code> in Explorer = Windows User Application Data (language-localized), for en_US: <code>C:\Documents and Settings\''username''\Application Data\</code>. | |||
# Files in the application installation directory: <code>''APPINSTALLDIR''/licenses/{license.dat,*.lic}</code> | |||
--> | |||
* The license path all Lumerical application is stored in one of the following files: | |||
<pre> | |||
<USER_HOME_DIR>/.config/Lumerical/License.ini | |||
<LUMERICAL_INSTALL_DIR>/Lumerical/License.ini | |||
</pre> | |||
: The first of these files found will be used. | |||
* You may edit the files manually in a text editor while the respective application ''is not running''. (Otherwise your edits will be overwritten when the application closes and saves state.) | |||
* The file contents are as follows: <!-- will be one of the following, depending on your situation as described in the previous two sections: --> | |||
==== When inside CNM ==== | |||
<syntaxhighlight lang="ini"> | |||
[license] | |||
ansysserver\host=1055@clicense1:1055@clicense2:1055@clicense3 | |||
default=user | |||
domain=2 | |||
</syntaxhighlight> | |||
<!-- | |||
; Discontinued 2022-08: | |||
;flexserver\host=27011@clicense1:27011@clicense2:27011@clicense3 | |||
or | |||
<syntaxhighlight lang="ini"> | <syntaxhighlight lang="ini"> | ||
[license] | [license] | ||
type=flex | type=flex | ||
flexserver\host=27011@ | flexserver\host=27011@127.0.0.1 | ||
</syntaxhighlight> | |||
--> | |||
==== When outside CNM ==== | |||
<syntaxhighlight lang="ini"> | |||
[license] | |||
ansysserver\host=1055@localhost | |||
default=user | |||
domain=2 | |||
</syntaxhighlight> | </syntaxhighlight> | ||
* To use, set up SSH tunneling for ports <code>1055</code> and <code>27011</code> (both are needed, as of 2023). | |||
=== Legacy mechanism | <!-- | ||
This was the license mechanism [http://docs.lumerical.com/en/mode/install_lumerical_license_manager.html#installation] in use before version 8.6. | === Legacy mechanism (Retired) === | ||
This was the license mechanism [http://docs.lumerical.com/en/mode/install_lumerical_license_manager.html#installation] in use up to July 2013, before version 8.6. | |||
No license tokens for this mechanism remain active. | No license tokens for this mechanism remain active. | ||
It will be faded out during July 2013. | |||
To configure: | To configure: | ||
| Line 98: | Line 246: | ||
… | … | ||
Host clogin | Host clogin | ||
LocalForward 26044 | LocalForward 26044 clicense1:26044 | ||
… | … | ||
* In | * In fdtd-solutions, specify <code>localhost</code> as license server. | ||
[[Image:HPC 2011-10-10 Lumerical LM client setup.png|350px]] | [[Image:HPC 2011-10-10 Lumerical LM client setup.png|350px]] | ||
| Line 111: | Line 259: | ||
</syntaxhighlight> | </syntaxhighlight> | ||
--> | --> | ||
== Running compute jobs within fdtd-engine (FDTD) == | |||
To run a presumably parallel job, construct your model and task within the fdtd-solutions application and save it as an .fsp file. | |||
Then copy and customize the following job template, entering your account and file names: | |||
$LUMERICAL_HOME/sample.job | |||
'''Note:''' fdtd-engine does ''not'' support checkpointing. Select your <code>#PBS -l walltime</code> parameter generously. | |||
=== Memory issues === | |||
; Problem: | |||
When running an fdtd-engine compute job in parallel, during the final stage (Data Collection) the memory use of the MPI master process could dramatically increase. | |||
For example, during the calculation ("cruising") stage each MPI process may be happy with using 2-4 GB, but in the collection stage, the master process (MPI rank 0) may require 10 times as much and more. | |||
The other MPI processes evidently remain idle but running during the collection stage, and continue to hold on to their memory, which could amount to a valuable 10–15 GB, say. | |||
The increased memory demand may cause the node to go into swap, even for Carbon's "bigmem" nodes which have 48 GB RAM each. | |||
Swap use will be detected and at first tolerated by TORQUE (PBS), but after a few minutes TORQUE will kill the job. | |||
In that case, the following error will appear in the standard error stream: | |||
'''=>> PBS: job killed: swap rate due to memory oversubscription is too high''' | |||
mpirun: abort is already in progress...hit ctrl-c again to forcibly terminate | |||
mpirun: killing job... | |||
The standard output stream may reach 99% or 100%, then stop: | |||
0% complete. Max time remaining: 16 mins, 4 secs. Auto Shutoff: 1 | |||
1% complete. Max time remaining: 15 mins, 4 secs. Auto Shutoff: 1 | |||
… | |||
98% complete. Max time remaining: 20 secs. Auto Shutoff: 6.21184e-05 | |||
99% complete. Max time remaining: 9 secs. Auto Shutoff: 5.5162e-05 | |||
100% complete. Max time remaining: 0 secs. Auto Shutoff: 4.51006e-05 | |||
: For success, there should rather be several more lines with collection notes and of course "Simulation completed successfully". | |||
; Workarounds: | |||
* Try to collect less data. | |||
<blockquote> | |||
Chris K. from Lumerical Support wrote:<br> | |||
For example, all field monitors allow you to choose which E/H/P fields to collect. If you only care about power transmission through a monitor, you can disable all the E/H/P fields and just collect the 'net power'. You can also control the number of frequency points, and you can enable spatial downsampling, and obviously just make the monitors smaller. | |||
</blockquote> | |||
* Have the master process run on a node of its own, as shown at [[HPC/Submitting and Managing Jobs/Advanced node selection#Different PPN by node]]. You will trade away compute capacity for memory. '''Caveat:''' Try to keep the total number of cores highly divisible. Example: | |||
** A typical request for 64 cores: | |||
#PBS -l nodes=8:ppn=8 | |||
** Improved request: | |||
#PBS -l '''nodes=1:ppn=1:bigmem'''+'''1:ppn=7'''+7:ppn=8 | |||
#PBS -l naccesspolicy=SINGLEJOB -n | |||
Note that the <code>+</code> sign is a field delimiter in the "nodes" specification. | |||
This specification requests the same number of cores total, but split up the load of the original first node over two nodes, one with a single core, and the second with the remaining 7 cores, followed by as many 8-core nodes as needed. | |||
<font color="#888">nodes = ( 1:ppn=1 ) + ( 1:ppn=7 ) + ( 7:ppn=8 ) = 1 + 7 + 7 * 8 = 64 cores.</font> | |||
Rank 0 will have the entire RAM on the first node available, and is the only rank to likely need "bigmem". The other ranks are modest in memory needs and unlikely to face contention. | |||
Usually, Moab will ensure that all ranks run on the same node generation, in this case gen2 (see [[HPC/Submitting and Managing Jobs/Advanced node selection#Hardware]]). | |||
== Running Optimization Jobs == | |||
* Prepare your optimization project as needed, save it as *.fsp file, and if needed copy it onto Carbon. | |||
* Open fdtd-solutions on Carbon. | |||
=== Resource Configuration === | |||
* Click Configure resources under the Simulation menu entry. | |||
* Remove all but the "localhost" entry. | |||
*: [[Image:HPC 2014-04-28 Lumerical optimizations 1.png]] | |||
* Push Add. | |||
* Double-click the Name column of the new resource entry, enter "Carbon", and press enter. | |||
*: [[Image:HPC 2014-04-28 Lumerical optimizations 2.png]] | |||
* Push Edit. | |||
* Enter the advanced options as shown: | |||
*: [[Image:HPC 2014-04-28 Lumerical optimizations 3.png]] | |||
Job launching: Custom | |||
mpiexec engine: '''/opt/apps/lumerical/8.16.931-1/bin/'''mpiexec-as-job | |||
(Copy the directory components from the "FDTF engine" setting below). | |||
Extra mpiexec command line options: -l nodes=1:ppn=8 -l walltime=2:00:00 -- | |||
Suppress any default mpiexec options: yes | |||
Bypass mpi on localhost: no | |||
FDTD engine: (leave default) | |||
Extra FDTD … options: (leave empty) | |||
Create log for all processes: no | |||
: | |||
* Push OK. The window will close. | |||
=== Testing the Configuration === | |||
* In the toplevel Resource Configuration window you may want to push "Run tests". This may work and you get "MPICH tests completed successfully". Likely, this will turn into "Timeout" shortly afterwards. | |||
*: [[Image:HPC 2014-04-28 Lumerical optimizations 4.png]] | |||
*: [[Image:HPC 2014-04-28 Lumerical optimizations 5.png]] | |||
* Duplicate the "Carbon" resource about 5-8 times. | |||
* Push Save. | |||
You are ready to run the optimization. | |||
=== Running the optimization === | |||
* You'll get windows like the following. There will be several volleys, each producing a "swarm" point in the figure-of-merit trend plot. | |||
*: [[Image:HPC 2014-04-28 Lumerical optimizations 6.png]][[Image:HPC 2014-04-28 Lumerical optimizations 7.png]][[Image:HPC 2014-04-28 Lumerical optimizations 8.png]] | |||
; Hints: | |||
* You may go back and edit the Advanced options of a resource, but you must remove all other previously cloned entries, and re-clone the newly edited resource. | |||
* When you choose to provide qsub options under "Extra mpiexec command line options", such as to allow for a walltime longer than the default 1 hour, ensure to append "--". | |||
Latest revision as of 15:09, August 22, 2023
Introduction
Lumerical consists of several applications, the most popular being FDTD Solutions to perform photonics modeling. Others are Multiphysics (formerly DEVICE), MODE, and INTERCONNECT.
The applications typically have two primary components.
- A design application (GUI). These are licensed by user.
- A solver, or engine, licensed by compute job.
Lumerical was originally produced by Lumerical, Inc., which has been acquired by Ansys in 2020. Ansys introduced major changes to the Lumerical licensing engine and terms, notably limiting user eligibility and reducing concurrent capabilities of solvers.
Access
Access to Lumerical is limited to Argonne staff who are CNM users, and to CNM staff.
To request access, submit a support request.
Manual and Knowledge Base
Ways to run Lumerical GUI applications
The Lumerical applications, both GUI and compute engines, can be run on any desktop or laptop computer, and on our HPC cluster, Carbon. In every situation, the application requires network access to a Lumerical license service running on Carbon.
For the GUI applications, there are three ways to run:
- Run on your desktop or laptop directly and use license port forwarding. For versions 2021 and later, this is possible on Linux or Windows only, because ANSYS decided to no longer offer macOS packages.
- Run on Carbon and display on your machine over X11 forwarding
- Run on Carbon in a VNC virtual desktop and display that desktop on your machine.
Here are considerations to help you choose:
Directly on your computer – for Windows/Linux only
Run any Lumerical application directly, or natively on your Windows or Linux machine; Macs are not supported from 2021 on. The application needs to be installed on your machine and be configured to obtain the Lumerical license over the network from Carbon.
- Advantage: Native graphics speed.
- Caveat: When running outside of CNM (which is possible), you will need an active network connection to NST.
To get started:
- You will need to have the Lumerical software installed on your desktop or laptop.
- For an Argonne-owned machine, submit an IT support request to have the software installed.
- For your own machine, you must have Lumerical binaries installed yourself, either through your home institution or by stepping up from a trial version.
- In the application, configure license access as shown below.
On Carbon, over X11 – for Windows/Linux/Mac
Run a Lumerical GUI application on a Carbon login node, and have its windows appear on your screen using the X Window system
fdtd-solutions &
- Requires an X11 server application on your desktop machine.
- Requires X11 forwarding under SSH.
- Advantage: Runs with its own windows, has basic Copy&Paste support.
- Disadvantage: May run sluggish.
On Carbon, over VNC – for Windows/Linux/Mac
Run a Lumerical GUI application on Carbon in a VNC virtual desktop, and view this virtual desktop on your machine.
- Requires a VNC client on your side.
- Advantage: uses compression and hence can be faster than X11.
- Disadvantage: Limited desktop environment, Copy&Paste support depends on VNC viewer client.
Ways to run Lumerical compute engine applications
For the compute engine, there are two distinct ways to run:
Running within the GUI application
Select this means when you expect the compute task to complete relatively quickly – say, up to an hour or so, or however long you can tolerate to dedicate CPU on your machine.
- Push the "Run" button in the GUI.
- Wait for the result.
- Analyze results in the GUI.
Running as a batch job on Carbon
Select this means when the compute task runs for a longer time, or you have many compute tasks, in particular when you run a "parameter sweep". Running a sweep on Carbon allows you to process the grid points of your parameter mesh in parallel over the CPUs on one compute node or even on several compute nodes.
To run a batch job:
- Design and your model in the GUI.
- Place "monitors" as you need.
- For a parameter sweep: define your parameter grid, i.e., the variables, search intervals, and number of variable steps.
- Save the model as
*.fspfile. - Transfer the file to Carbon (if you did the above steps on your machine).
- Copy and adapt one of the Carbon Lumerical job templates for your model.
- Submit the job.
- Await job completion, either by inspection, or by receiving a job completion mail.
- Transfer any updated
*.fspfiles back from Carbon to your machine, if so desired, for analysis there.
Configuring license access when not running on Carbon directly
To use the #Native Lumerical applications on your computer, as opposed to running on Carbon over a graphical connection, the following conditions must be met:
- Your computer must be able to reach the Carbon license server, at least while you run any of the Lumerical applications.
- Your Lumerical suite must be configured to use those license servers.
The specific configuration steps depend on the network location of your computer, as follows:
When inside CNM or using VPN as a CNM staff member or postdoc
Reminder: Licensing for all Lumerical applications running on Carbon itself (i.e., as started on a login node or by a batch job) are pre-configured, so none of the following applies there.
On your desktop or laptop, do the following:

- Verify that your computer is connected inside of CNM's network, by one of the following:
- a wired connection in a CNM building (440, 441), or
- over Argonne-auth WiFi in the same building, or
- over Argonne VPN, established as a CNM staff user.
- A connection over the Argonne-guest WiFi network or over VPN as a user of another division will not suffice.
- In a web browser open the following URL exactly as shown, i.e., having a bare hostname without dots:
- If you get a status page mentioning "Carbon", your configuration is OK. Proceed to step 2.
- Otherwise, you will see an error message similar to "server cannot be found". Proceed as follows:
- Example for mac OS
- Open your computer's "Network" configuration settings.
- Select the "VPN" configuration profile.
- If needed, unlock the panel to make changes. You may need to have administrator privileges to do so. Request assistance if needed.
- push the "Advanced…" button.
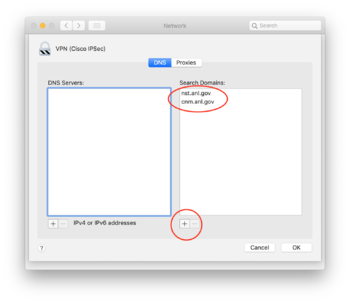
- Locate the tab or section for DNS configuration.
- Add
cnm.anl.govas a DNS Search Domain and apply the settings. - Retry the link above.
- Explanation: There are two reasons for the steps above:
- Accommodate both
nst.anl.govandcnm.anl.govas domain names. Carbon-based license services use only the latter. - Accommodate license access from both inside and outside of the Carbon cluster.
- Start the License Configure or simply the main FDTD Solutions application on your machine.
- Note: You may see a window with title "Getting Started" containing a notice titled "Blocked by Outdated Software" from Argonne's Cyber Security Program Office. You may safely close the window. The notice appears because the window is a web page that is rendered by an often older browser engine compiled-in to FDTD.
- If you started FDTD Solutions, locate the Configure License menu item, either in the application or Help menu.
- Choose the tab "Floating" in the Configure License window.
- Activate the checkbox: Configure redundant servers.
- Set the Server entries to
clicense1,clicense2, andclicense3, exactly as shown, without a domain name part.
- If you used the License Configure app, close it, and start the main FDTD Solutions application.
- In FDTD, choose About FDTD Solutions.

Check license access configuration
License settings change across releases. For reference on recent versions, see the panels below.
-
 License config 2022
 -
 License config 2023


Note on Web blocking

- Problem
For the About Lumerical menu item, instead of proper license information, an Argonne network blocking page may appear when using an older (or even not-so old) version of FDTD. This is due to Lumerical using a built-in web browser engine that may be considered outdated by Argonne's network security configuration.
- Workaround
- Close the About window and work normally. Normal operation should not be affected by the blocking.
When outside CNM
- Close any connection to Carbon's login nodes, and Mega.
- Revisit the port forwarding configuration for your your SSH client (one-time only).
- Mac and Linux users: Add to ~/.ssh/config, in the section for mega:
Host mega
	…
	# ANSYS-LM at former Lumerical-LM
	LocalForward	1055	clicense1:1055
	LocalForward	27011	clicense1:27011
- Windows users: See HPC/Network Access/PuTTY Configuration/Accessing Carbon licenses remotely
- Re-open the connection to Mega.
- Install or upgrade the Lumerical application
- Open Lumerical as usual.
- Select the "Licenses" menu item.
- Open the "Floating" tab.
Enter the host IP address as follows:

- Note: Do not use "localhost" - this is ambiguous when IPv6 is in play.
- Push "Apply".
- Start Lumerical.: To inspect the license setting, choose About Lumerical from the application menu.

File-based license configuration (advanced)
- The license path all Lumerical application is stored in one of the following files:
<USER_HOME_DIR>/.config/Lumerical/License.ini
<LUMERICAL_INSTALL_DIR>/Lumerical/License.ini
- The first of these files found will be used.
- You may edit the files manually in a text editor while the respective application is not running. (Otherwise your edits will be overwritten when the application closes and saves state.)
- The file contents are as follows:
When inside CNM
[license]
ansysserver\host=1055@clicense1:1055@clicense2:1055@clicense3
default=user
domain=2
When outside CNM
[license]
ansysserver\host=1055@localhost
default=user
domain=2
- To use, set up SSH tunneling for ports
1055and27011(both are needed, as of 2023).
Running compute jobs within fdtd-engine (FDTD)
To run a presumably parallel job, construct your model and task within the fdtd-solutions application and save it as an .fsp file. Then copy and customize the following job template, entering your account and file names:
$LUMERICAL_HOME/sample.job
Note: fdtd-engine does not support checkpointing. Select your #PBS -l walltime parameter generously.
Memory issues
- Problem
When running an fdtd-engine compute job in parallel, during the final stage (Data Collection) the memory use of the MPI master process could dramatically increase. For example, during the calculation ("cruising") stage each MPI process may be happy with using 2-4 GB, but in the collection stage, the master process (MPI rank 0) may require 10 times as much and more. The other MPI processes evidently remain idle but running during the collection stage, and continue to hold on to their memory, which could amount to a valuable 10–15 GB, say. The increased memory demand may cause the node to go into swap, even for Carbon's "bigmem" nodes which have 48 GB RAM each. Swap use will be detected and at first tolerated by TORQUE (PBS), but after a few minutes TORQUE will kill the job. In that case, the following error will appear in the standard error stream:
=>> PBS: job killed: swap rate due to memory oversubscription is too high
mpirun: abort is already in progress...hit ctrl-c again to forcibly terminate

mpirun: killing job...
The standard output stream may reach 99% or 100%, then stop:
0% complete. Max time remaining: 16 mins, 4 secs. Auto Shutoff: 1
1% complete. Max time remaining: 15 mins, 4 secs. Auto Shutoff: 1
…
98% complete. Max time remaining: 20 secs. Auto Shutoff: 6.21184e-05
99% complete. Max time remaining: 9 secs. Auto Shutoff: 5.5162e-05
100% complete. Max time remaining: 0 secs. Auto Shutoff: 4.51006e-05
- For success, there should rather be several more lines with collection notes and of course "Simulation completed successfully".
- Workarounds
- Try to collect less data.
Chris K. from Lumerical Support wrote:
For example, all field monitors allow you to choose which E/H/P fields to collect. If you only care about power transmission through a monitor, you can disable all the E/H/P fields and just collect the 'net power'. You can also control the number of frequency points, and you can enable spatial downsampling, and obviously just make the monitors smaller.
- Have the master process run on a node of its own, as shown at HPC/Submitting and Managing Jobs/Advanced node selection#Different PPN by node. You will trade away compute capacity for memory. Caveat: Try to keep the total number of cores highly divisible. Example:
- A typical request for 64 cores:
#PBS -l nodes=8:ppn=8
- Improved request:
#PBS -l nodes=1:ppn=1:bigmem+1:ppn=7+7:ppn=8
#PBS -l naccesspolicy=SINGLEJOB -n
Note that the + sign is a field delimiter in the "nodes" specification.
This specification requests the same number of cores total, but split up the load of the original first node over two nodes, one with a single core, and the second with the remaining 7 cores, followed by as many 8-core nodes as needed.
nodes = ( 1:ppn=1 ) + ( 1:ppn=7 ) + ( 7:ppn=8 ) = 1 + 7 + 7 * 8 = 64 cores.
Rank 0 will have the entire RAM on the first node available, and is the only rank to likely need "bigmem". The other ranks are modest in memory needs and unlikely to face contention. Usually, Moab will ensure that all ranks run on the same node generation, in this case gen2 (see HPC/Submitting and Managing Jobs/Advanced node selection#Hardware).
Running Optimization Jobs
- Prepare your optimization project as needed, save it as *.fsp file, and if needed copy it onto Carbon.
- Open fdtd-solutions on Carbon.
Resource Configuration
- Click Configure resources under the Simulation menu entry.
- Remove all but the "localhost" entry.
- Push Add.
- Double-click the Name column of the new resource entry, enter "Carbon", and press enter.
- Push Edit.
- Enter the advanced options as shown:


	Job launching:				Custom

	mpiexec engine:				/opt/apps/lumerical/8.16.931-1/bin/mpiexec-as-job
						(Copy the directory components from the "FDTF engine" setting below).

	Extra mpiexec command line options:	-l nodes=1:ppn=8 -l walltime=2:00:00 --
	Suppress any default mpiexec options:	yes
	Bypass mpi on localhost:		no

	FDTD engine:				(leave default)
	Extra FDTD … options:			(leave empty)
	Create log for all processes:		no
- Push OK. The window will close.
Testing the Configuration
- In the toplevel Resource Configuration window you may want to push "Run tests". This may work and you get "MPICH tests completed successfully". Likely, this will turn into "Timeout" shortly afterwards.
- Duplicate the "Carbon" resource about 5-8 times.
- Push Save.


You are ready to run the optimization.
Running the optimization
- You'll get windows like the following. There will be several volleys, each producing a "swarm" point in the figure-of-merit trend plot.


- Hints
- You may go back and edit the Advanced options of a resource, but you must remove all other previously cloned entries, and re-clone the newly edited resource.
- When you choose to provide qsub options under "Extra mpiexec command line options", such as to allow for a walltime longer than the default 1 hour, ensure to append "--".