HPC/Network Access/Virtual Desktop
Principle of operation
VNC is a multi-platform graphical remote access mechanism. It is not as common as the X Window System that serves a similiar purpose but is more light-weight on the user side and over the network. If you find that graphical remote use over X11 is too slow, try VNC. It operates as follows:
- You start a VNC server on a Carbon login node. This is an application process that runs under your user ID in the background and provides a virtual desktop for you.
- You need to augment your SSH connection to forward an appropriate port.
- You run a VNC client on your desktop machine and tell it to connect to the forwarded port. This will open the virtual desktop as a window on your actual desktop.
- You can stop your VNC client and reconnect later.
- When done, you kill the VNC server process on Carbon.
Operating a virtual desktop session
Start the server
- Log in to Carbon using ssh as documented.
- On the Carbon prompt (showing either login5 or login6 as host name), enter:
vncserver
- At the first time, you will be asked for a password which will limit access to your virtual desktop session.
- Choose and remember a password of good strength, but not your login password. The VNC password storage mechanism is weak; think of it as a door to shut, keeping out unwanted guests.
- Take note of the display number from the output of the vncserver command:
New 'login5:1 (stern)' desktop is login5:1

Starting applications specified in /home/stern/.vnc/xstartup
Log file is /home/stern/.vnc/login5:1.log
- The display number is shown after the
:in the virtual desktop address, the last word on the first line. Display numbers by default are chosen automatically.
- The display number is shown after the
Forward the server's port
Forward a network port from your machine to the same port on the Carbon login node. How to do that depends on the SSH program you use, and which port to forward depends on the display number.
- For Linux and Mac
- Press
<Enter> ~ C(three keys in succession: enter, tilde, capital C). You should get a prompt like this:
ssh>
- At the prompt, enter:
-L port:localhost:port
- where
port= 5900 + display number (from above), for example:
ssh> -L 5901:localhost:5901
Forwarding port.
- Press
<Enter>to regain your regular prompt.
- For PuTTY on Windows
Configure your PuTTY Clogin session to apply #Anticipatory port forwarding (see section below). It appears PuTTY does not support adding tunnels on the fly.
Connect with a client
- On a Mac
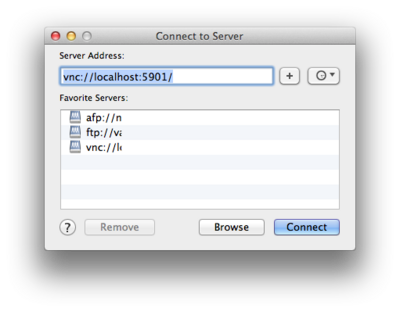
- Select Connect to Server… from the Finder's menu, or press Command + K.
- Enter the Server Address in the form
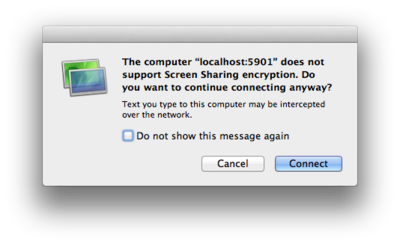
vnc://localhost:portnum/and push Connect. - You will get a warning that the connection is not encrypted. The impact is fairly low as the unencrypted part of the connection runs merely between two processes on the same host (sshd and vncserver) and does not go out over the network. The main remote connection from your own desktop to clogin will continue to be encrypted over the ssh channel.
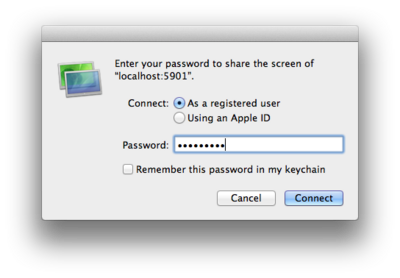
- Enter the VNC password you chose earlier.
- Update 2015-07-27 – EL6 Bug
- When running vncserver on CentOS 6 and using the builtin Mac Screen Sharing application, the keyboard might "hang".
- Background: It appears this is a bug in the TigerVNC package that has replaced the RealVNC package in CentOS-6.
- Workaround: download and use the TigerVNC application for Mac and use its VNC viewer instead of Mac's Screen Sharing.
- On WIndows
- Select and install a VNC client.
- Start the VNC client
- See e.g. Using VNC Viewer in the RealVNC-5.0 documentation.
- Connect to the VNC server at address
127.0.0.1:displaynum
- Follow your VNC client's documentation.
Use the virtual desktop
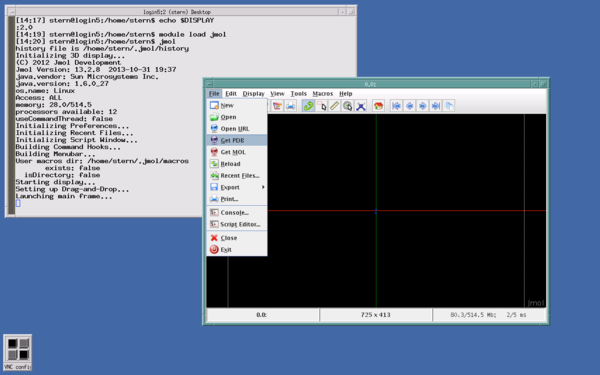
- Your virtual desktop will be running an xterm command line window and the Motif Window Manager. The desktop is deliberately kept simple to reduce overhead and startup times.
- You can use the virtual desktop like a regular X11 session. Use the xterm command line to run shell commands or to start graphical applications, such as the Jmol molecular visualization application.
$ echo $DISPLAY
:1.0
$ module load jmol
$ jmol
- To open another terminal window, run the command
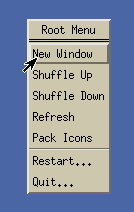
xterm &or right-click and select New Window.
Stop the server
Stop the server when you no longer need the virtual desktop. On a Carbon login node where you started the VNC server, enter:
vncserver -kill :displaynum
All child processes that used the desktop will be killed, and VNC client connections will be severed.
Tips
Please practice good housekeeping and do not needlessly leave vncserver processes running. Stale vncserver processes (those that have not been used for days) will be killed.
Avoiding multiple VNC sessions
- Avoid concurrent VNC sessions on different hosts, or even multiple VNC sessions on the same host.
- To inspect your current VNC processes, use the command
vncserver -l
- Unfortunately, this command shows desktops on only the current node, but you may have a VNC session running on a different login node. To see a list of your current and past connections on all nodes, inspect the VNC log files:
ls -ltr ~/.vnc
- This can be a bit of a jumble, as files from old connections will linger even after they were cleanly disconnected. Pay attention to the file dates.
- To use an existing session or clean up, log in to the specific node.
Customizing the virtual desktop
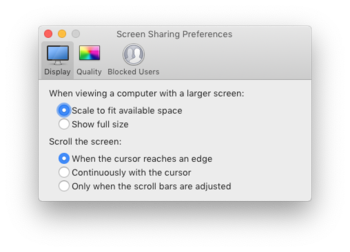
- Override the size and color depth of the virtual desktop by supplying options to
vncserver:
vncserver -geometry 1920x1080 -depth 24
- These options will raise your network bandwidth requirements. For more, see
man vncserver
Screen Sharing on the Mac
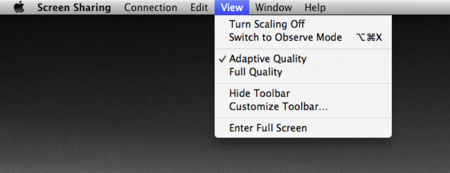
- Recent Screen Sharing versions will pass through almost all keyboard input, which effectively disables many regular OS X keyboard shortcuts, in particular those for switching applications and taking screen shots.
- To switch from Screen Sharing to another application, click on its Dock icon.
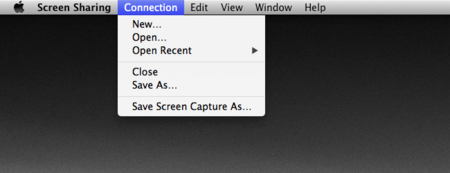
- To take a screen shot, select Save Screen Capture As… from the Connection menu of the Screen Sharing application menu.
- To take screen shots more easily and use various other control options, choose Show Toolbar from the View menu of the Screen Sharing application menu.
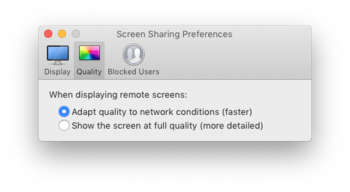
The screen shots were taken under macOS 10.14. Other OS versions will look slightly differently.
Anticipatory port forwarding
The VNC server allocates its ports and displays from a pool that all users have access to on a particular machine. As a result, display numbers vary as soon as more than one user uses VNC at a given time. The procedure above sets up port forwarding for just the port that your server selected. You can avoid the step of having to manually identify and forward that port by preemptively forwarding a broader range of ports. This is not guaranteed to cover all cases but will be sufficient for most, given the fairly sporadic use of VNC. You must, however, still tell your VNC client application which displaynum (5900 + x) or :port (":x") to connect to.
Port forwarding depends on the SSH client you use.
- OpenSSH (Linux, Mac)
1. Edit (or create) your file $HOME/.ssh/config.
2. Locate (or add) the section beginning with
Host clogin
3. Add the following lines.
	LocalForward  5901	localhost:5901
	LocalForward  5902	localhost:5902
	LocalForward  5903	localhost:5903
	LocalForward  5904	localhost:5904
	LocalForward  5905	localhost:5905
	LocalForward  5906	localhost:5906
	LocalForward  5907	localhost:5907
	LocalForward  5908	localhost:5908
	LocalForward  5909	localhost:5909
	LocalForward  5910	localhost:5910
The forwards will be active the next time you connect to clogin.
- PuTTY (Windows)
1. Configure PuTTY port forwarding as shown in the context of remote license access. Use the port numbers as shown in the previous section. They should appear in the Forwarded ports section of the Tunnels panel as:
L5901  localhost:5901
L5902  localhost:5902
…
Again, these forwards will be active the next time you connect to clogin.
Troubleshooting
- To reset your VNC password, run:
vncpasswd
- You can do so at any time, even after vncserver has started and before you reconnect.
- To see a list of recent VNC servers that you might be running:
ls -ltr ~/.vnc/*.pid
- Identify and inspect server log files:
ls -ltr ~/.vnc/*.log
cat ~/.vnc/$HOSTNAME:displaynum.log
- X11-style Copy&Paste requires a 3-button mouse. Diagnose your mouse button mappings using the xev command. Move your mouse into the xev window and click the buttons. Look for events like this:
ButtonPress event, serial 31, synthetic NO, window 0x600001,
    root 0x281, subw 0x600002, time 784185758, (35,33), root:(39,55),
    state 0x0, button 3, same_screen YES
- You can simply and unceremoniously kill all your vncservers on a given host by using the Unix kill command. For good measure, run it twice, then clean up:
kill `cat ~/.vnc/$HOSTNAME*.pid`
kill `cat ~/.vnc/$HOSTNAME*.pid`
rm ~/.vnc/$HOSTNAME*.pid
