HPC/Applications/lumerical: Difference between revisions
m (→Memory issues) |
|||
| Line 44: | Line 44: | ||
For example, all field monitors allow you to choose which E/H/P fields to collect. If you only care about power transmission through a monitor, you can disable all the E/H/P fields and just collect the 'net power'. You can also control the number of frequency points, and you can enable spatial downsampling, and obviously just make the monitors smaller. | For example, all field monitors allow you to choose which E/H/P fields to collect. If you only care about power transmission through a monitor, you can disable all the E/H/P fields and just collect the 'net power'. You can also control the number of frequency points, and you can enable spatial downsampling, and obviously just make the monitors smaller. | ||
</blockquote> | </blockquote> | ||
* Have the master process run on a node of its own. | * Have the master process run on a node of its own, as shown at [[HPC/Submitting and Managing Jobs/Advanced node selection#Different PPN by node]]. You will trade away compute capacity for memory. '''Caveat:''' Try to keep the total number of cores highly divisible. Example: | ||
: Original request: | : Original request: | ||
#PBS -l nodes=8:ppn=8 | #PBS -l nodes=8:ppn=8 | ||
| Line 50: | Line 50: | ||
#PBS -l '''nodes=1:ppn=1:bigmem'''+'''1:ppn=7'''+7:ppn=8 | #PBS -l '''nodes=1:ppn=1:bigmem'''+'''1:ppn=7'''+7:ppn=8 | ||
#PBS -l naccesspolicy=SINGLEJOB -n | #PBS -l naccesspolicy=SINGLEJOB -n | ||
This will request: | This will still request 56 cores total, but split up the load of the original first node into two nodes, one with a single core, and the second with the remaining 7 cores, followed by as many 8-core nodes as needed. | ||
<font color="#888">nodes = ( 1:ppn=1 ) + ( 1:ppn=7 ) + ( 7:ppn=8 ) = 1 + 7 + 7 * 8 = 56 cores</font> | |||
== Running the GUI (CAD) == | == Running the GUI (CAD) == | ||
Revision as of 20:55, December 12, 2013
Introduction
Lumerical has two main components:
- CAD: The GUI. We have licensed 2 concurrent seats.
- FDTD: The compute engine, called either by the GUI or in a PBS job file. We have 2 + 10 concurrent seats.
Manual and Knowledge Base
http://docs.lumerical.com/en/fdtd/knowledge_base.html
Running compute jobs (FDTD)
To run a presumably parallel job, save your input file in CAD as .fsp file. Then copy and customize the following job template, entering your account and file names:
$LUMERICAL_HOME/sample.job
Note: FDTD does not support checkpointing (thanks to Julian S. for checking). Select your #PBS -l walltime parameter generously.
Memory issues
- Problem
The final stage of FDTD, the Data Collection stage, may severely increase the memory requirements of the MPI master process. For example, while each MPI process during the calculation ("cruising") stage may be happy with 2-4 GB, in the collection stage, the master process may require 10 times as much. At 48 GB/node, this may cause the node to go into swap, which will be tolerated for only a few minutes. If the collection cannot finish, the following error will occur:
- standard output stream:
0% complete. Max time remaining: 16 mins, 4 secs. Auto Shutoff: 1
1% complete. Max time remaining: 15 mins, 4 secs. Auto Shutoff: 1
…
98% complete. Max time remaining: 20 secs. Auto Shutoff: 6.21184e-05
99% complete. Max time remaining: 9 secs. Auto Shutoff: 5.5162e-05
100% complete. Max time remaining: 0 secs. Auto Shutoff: 4.51006e-05
- standard error stream:
=>> PBS: job killed: swap rate due to memory oversubscription is too high
mpirun: abort is already in progress...hit ctrl-c again to forcibly terminate

mpirun: killing job...
- Workarounds
- Try to collect less data.
For example, all field monitors allow you to choose which E/H/P fields to collect. If you only care about power transmission through a monitor, you can disable all the E/H/P fields and just collect the 'net power'. You can also control the number of frequency points, and you can enable spatial downsampling, and obviously just make the monitors smaller.
- Have the master process run on a node of its own, as shown at HPC/Submitting and Managing Jobs/Advanced node selection#Different PPN by node. You will trade away compute capacity for memory. Caveat: Try to keep the total number of cores highly divisible. Example:
- Original request:
#PBS -l nodes=8:ppn=8
- Improved request:
#PBS -l nodes=1:ppn=1:bigmem+1:ppn=7+7:ppn=8
#PBS -l naccesspolicy=SINGLEJOB -n
This will still request 56 cores total, but split up the load of the original first node into two nodes, one with a single core, and the second with the remaining 7 cores, followed by as many 8-core nodes as needed.
nodes = ( 1:ppn=1 ) + ( 1:ppn=7 ) + ( 7:ppn=8 ) = 1 + 7 + 7 * 8 = 56 cores
Running the GUI (CAD)
There are three means to access Carbon's Lumerical licenses:
- Run on Carbon and display on your machine over X11 forwarding
- Run on Carbon in a VNC virtual desktop and display that desktop on your machine.
- Run on your desktop directly and use license port forwarding.
X11
Use the CAD X11 app on a Carbon login node.
CAD &
- Requires X11 forwarding under SSH.
- Disadvantage: May run slow or unstable.
VNC
Use CAD on Carbon in a VNC virtual desktop.
- Requires a VNC client on your side.
- Advantage: uses compression and hence can be faster than X11.
- Disadvantage: Limited desktop environment.
Native
Run CAD natively on your desktop, but connect to the Lumerical license server on Carbon.
- Advantage: Native graphics speed.
- Caveat: needs an active network connection to a Carbon login node.
Remote license access
To use #Native access, your desktop copy of Lumerical must be configured to connect to Carbon's license server.
The license mechanism has recently changed.
FlexNet Licensing
This is a mechanism [1] in use for Lumerical version 8.6 onwards. To use your Lumerical desktop version, follow these steps:
When inside CNM or using VPN – does not apply to Carbon
- Verify that you are inside CNM's network by browsing to http://carbon/
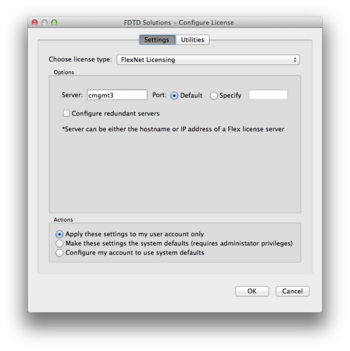
- In the Lumerical License configuration, Choose license type: FlexNet Licensing
- Set Server to
cmgmt3orcmgmt3.cnm.anl.gov.
Note: This section does not apply for running CAD or FDTD on Carbon itself.
When outside CNM
- Close any connection to Carbon's login nodes.
- Configure port forwarding for your your SSH client (one-time only).
- Mac and Linux users: Add to ~/.ssh/config:
…
Host clogin
    LocalForward 27011 mgmt03:27011
    LocalForward 27012 mgmt04:27012
    LocalForward 27013 sched1:27013
    …
- Windows users: See HPC/Network Access/PuTTY Configuration/Accessing Carbon licenses remotely
- Log in to clogin using ssh (each time): This will activate the forwarded ports configured in the previous step.
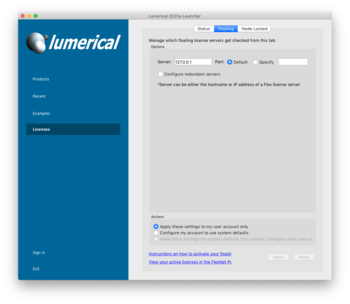
- Install or upgrade Lumerical.: When asked for the license information, choose FlexNet licensing and enter host names and port numbers as shown here:
- Start Lumerical.: To inspect the license setting, choose About Lumerical from the application menu.
The license setting is stored on Mac and Linux platforms in ~/.config/Lumerical/FDTD\ Solutions.ini and should read:
…
[license]
type=flex
flexserver\host=27011@localhost:27012@localhost:27013@localhost
Legacy mechanism - Retired July 2013
This was the license mechanism [2] in use before version 8.6. No license tokens for this mechanism remain active.

