STAR-CCM+: Difference between revisions
Created page with "=== Introduction === STAR-CCM+ was designed as a client-server application where the client is the graphical user interface (GUI) and the server performs the work of solving..." |
|||
| (One intermediate revision by the same user not shown) | |||
| Line 62: | Line 62: | ||
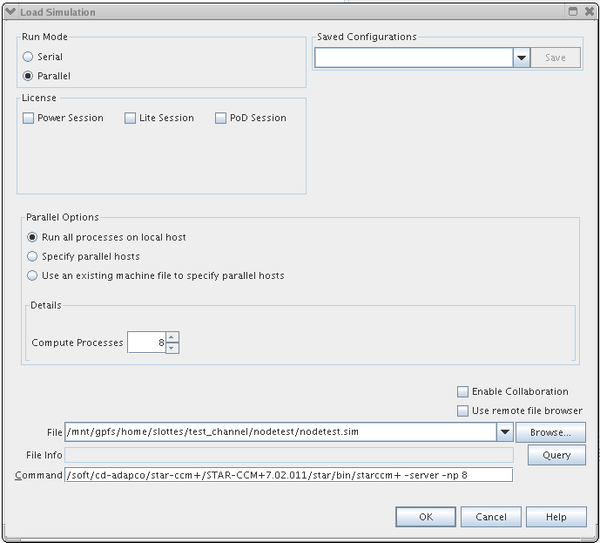
* Once the STAR-CCM+ client starts on the compute node, you can start the server on the same node and set it to run in parallel using all of its cores for meshing and solving the problem. | * Once the STAR-CCM+ client starts on the compute node, you can start the server on the same node and set it to run in parallel using all of its cores for meshing and solving the problem. | ||
[[Image:Starccm_parallel_dialog.png|600px]] | [[Image:600px-Starccm_parallel_dialog.png|600px]] | ||
* Exiting the software will clear both the client and server processes. | * Exiting the software will clear both the client and server processes. | ||
=== Running simulations in batch mode === | === Running simulations in batch mode === | ||
| Line 108: | Line 107: | ||
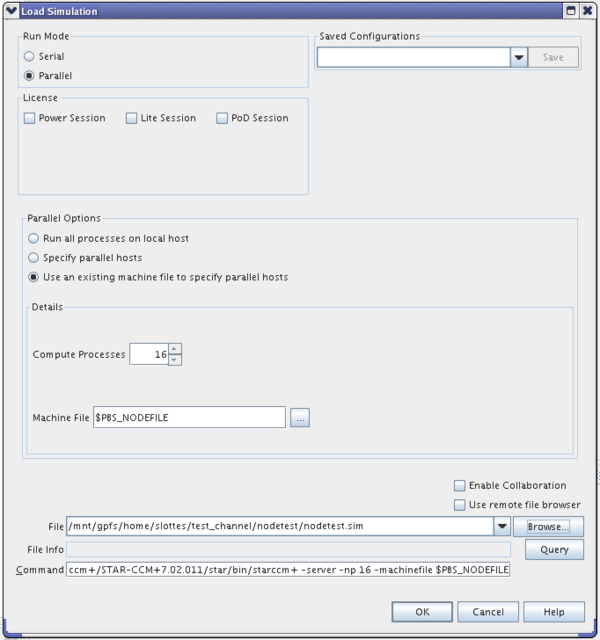
See example below. Typing $PBS_NODEFILE directly into the Machine File text box does not appear to work, but it should appear in the Machine File text box when it is added as the machinefile parameter in the Command text box. | See example below. Typing $PBS_NODEFILE directly into the Machine File text box does not appear to work, but it should appear in the Machine File text box when it is added as the machinefile parameter in the Command text box. | ||
[[Image:Starccm+load-sim-dialog-multinode.png|600px]] | [[Image:600px-Starccm+load-sim-dialog-multinode.png|600px]] | ||
You can also select "Specify parallel hosts" under "Parallel options" and manually enter the machine node names assigned to your job. | You can also select "Specify parallel hosts" under "Parallel options" and manually enter the machine node names assigned to your job. | ||
=== Licenses === | === Licenses === | ||
Latest revision as of 18:27, February 3, 2021
Introduction
STAR-CCM+ was designed as a client-server application where the client is the graphical user interface (GUI) and the server performs the work of solving the model problem. Many CFD problems of engineering interest require high performance computing (HPC) clusters for their solution. The client-server architecture of STAR-CCM+ allows the client to be located on a local computer while the server can be running on a remote HPC cluster. The GUI client will render graphics rapidly on the user’s local computer, while the server, which could be located either on a powerful local workstation or on a remote HPC cluster, does the bulk of the computational work. Both client and server can be run on the compute nodes of the TRACC clusters via the NX NoMachine remote desktop. However, the response time in the STAR-CCM+ GUI in this mode will, in general, be slow, especially when manipulating model geometry and visualizations in scenes. For routine use the client-server mode of use with local client is recommended. Setting up the various software components and procedures to use STAR-CCM+ in this efficient mode is documented below in the section: “Setting up STAR-CCM+ for use in client-server mode.” The section “Using STAR-CCM+ in local client–remote server mode” documents the much shorter steps needed to use the software in this mode.
Getting started
To use the latest stable version of STAR-CCM+, load its environment module:
module load star-ccm+
To see what versions are avaiable, do
module avail star-ccm+
To load a module for a specific version do
module load star-ccm+/<version #>
Documentation
The STAR-CCM+ manuals are in /soft/cd-adapco/star-ccm+X.XX.XXX/doc, where X.XX.XXX is the version number. Documentation is also available via an extensive help system in STAR-CCM+. If you used the module command above for the stable version, you can find out the version number with
which starccm+
Files needed for the tutorials are in sub-directory "tutorials" of the "doc" directory above. To work on a tutorial, copy the files for it to a directory under your home directory.
cp -a <tutorial-directory> <home-directory>
Pre- and post-processing
- For pre-processing (mesh generation and model set up) and post-processing, first request a compute node with
qsub -I -X -l walltime=8:00:00
or with
echo sleep 8h | qsub -joe -l walltime=8:00:00
- To find out which node your job was assigned to, do
jobnodes <job-id>
or with
echo $PBS_NODEFILE
- Then log in to the node with
ssh -Y nXXX
where nXXX is the name of the node.
- Once logged in to the compute node, initialize your environment variables as above.
- Start the STAR-CCM+ client GUI on the compute node.
starccm+ &
- Once the STAR-CCM+ client starts on the compute node, you can start the server on the same node and set it to run in parallel using all of its cores for meshing and solving the problem.
- Exiting the software will clear both the client and server processes.
Running simulations in batch mode
For long running simulations requiring more than one node, you can submit the job to the batch queue. We have an interactive script to simplify job submission. It will prompt you with questions on the resources needed.
ccmp_qs
This script will be in your PATH when you load a STAR-CCM+ module.
By default, the script will ask for 8 cores per node when it submits your job. If you want to use fewer than 8 cores per node, you can specify that as part of the "other queue options":
Enter other queue options, if any: -l nodes=2:ppn=6
Running simulations in interactive mode on multiple nodes
If a job only requires one node it can be run interactively by just clicking the running man in the tool bar, or selecting Solution --> Run from the memu.
Running a multi-node job interactively has the advantage that it will not terminate if you connect to it and decide to stop it to modify a setting or parameter, or change the simulation in other ways.
To run on multiple nodes:
Submit an interactive job to the queue with the number of nodes that are optimal for your job
qsub –I –X –l walltime=24:00:00,nodes=2:ppn=8
Note that ppn (processors per node) should be 8 on the Phoenix cluster and 16 on the Zephyr cluster. You will be automatically logged in to the primary node for your job when it starts. Then do
module load star-ccm+/<version number>
Start the STAR-CCM+ GUI
starccm+ &
On the toolbar, click the load simulation button.
Set the following parameters in the Load Simulation dialog box: Run mode = parallel; Under parallel select "Use an existing machine file to specify parallel hosts; set the number of compute processes to ppn*(number of nodes); browse to your sim file and select it. The machine file name that lists your job nodes is the value of the environment variable PBS_NODEFILE. Add this parameter to the end of the Command text box:
-machinefile $PBS_NODEFILE
See example below. Typing $PBS_NODEFILE directly into the Machine File text box does not appear to work, but it should appear in the Machine File text box when it is added as the machinefile parameter in the Command text box.
You can also select "Specify parallel hosts" under "Parallel options" and manually enter the machine node names assigned to your job.
Licenses
The STAR-CCM+ license allows for 16 sessions of the STAR-CCM+ server and 1000 cores for all sessions.

