Email Services/Zimbra User Documentation/Creating a calendar to share: Difference between revisions
Jump to navigation
Jump to search
No edit summary |
No edit summary |
||
| Line 12: | Line 12: | ||
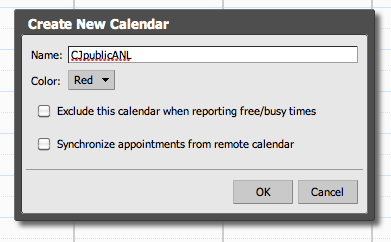
When you click on this to create your new calendar, type the name you've chosen ('''without spaces!''') and perhaps color it red to remind yourself that it's a publicly-viewable calendar: | When you click on this to create your new calendar, type the name you've chosen ('''without spaces!''') and perhaps color it red to remind yourself that it's a publicly-viewable calendar: | ||
[[File: | [[File:zcal_name_calendar.png]] | ||
Your new calendar now exists. However, you still need to do two more things in Zimbra: | |||
* Share the calendar with a colleague at Argonne, so that they can view it and add or edit events. | |||
* Share the calendar for viewing (read-only) by anyone. | |||
Revision as of 19:08, April 22, 2011
Creating a Public Calendar
As a first step to making public sharing possible, you should create a calendar that is
- separate from your default calendar and
- by its name it reminds you that it's a publicly-viewable calendar.
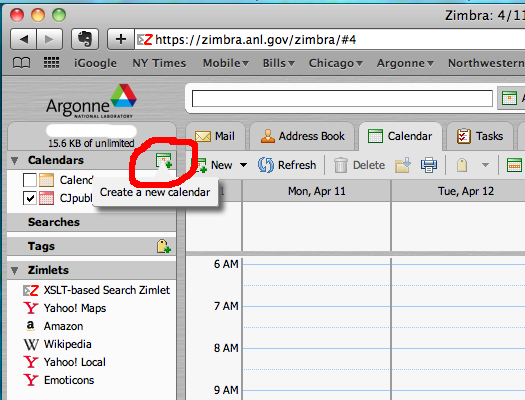
You should choose a name with no spaces in it; in my case I chose a name of "CJpublicANL" for my publicly-viewable Zimbra calendar. To do this, first go to the web page http://zimbra.anl.gov and log in. Pick the Calendar tab at the top, and then create a new calendar by clicking on the calendar add button at the upper left:
When you click on this to create your new calendar, type the name you've chosen (without spaces!) and perhaps color it red to remind yourself that it's a publicly-viewable calendar:
Your new calendar now exists. However, you still need to do two more things in Zimbra:
- Share the calendar with a colleague at Argonne, so that they can view it and add or edit events.
- Share the calendar for viewing (read-only) by anyone.

