HPC/Network Access/WinSCP Configuration
< HPC | Network Access
Jump to navigation
Jump to search
Configuring
The following steps need to be performed once for each workstation you wish to use to access Carbon.
- Open WinSCP. The WinSCP Configuration window will appear.
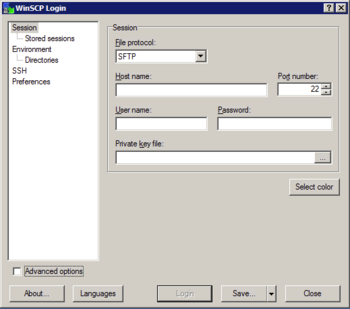
- Configuration panels will appear in the main part of the window on the right-hand side. The panels are organized in a tree shown in the left-hand side of the window. Each panel can be reached by clicking on the leaf names of the tree.
- Click Advanced options beneath the tree.
- Click Tunnel under Connection in the tree.
- Click Connect through SSH tunnel.
- Enter mega.cnm.anl.gov as Host name and your Argonne username and password in the fields on the right. Leave other options as is.
- Click Session at the top of the tree.
- Enter "clogin" as Host name and your Argonne username and password in the fields on the right. Leave other options as is.
- Push Save… and name this session "Clogin".


Connecting
- From the WinSCP Configuration window, select the session named Clogin and push Login.
- A small progress window appears. The first time, you will be asked to confirm and store two server host keys, the first for mega, the second for clogin. Compare the key fingerprints and push Yes if they match.
- When prompted, enter your Argonne account password. You have several attempts to get it right. After too many attempts, your account will be temporarily locked.
- You should be promted twice – once for an implicit connection to mega, the second time for clogin itself.
- Use the main WinSCP interface to transfer files in either directions.
- If you have PuTTY installed in addtion to WinSCP, select Open in PuTTY from the WinSCP Commands menu or click the PuTTY icon in the WinSCP tool bar to open one or more zero-config terminal sessions. Learn more about WinSCP/PuTTY integration.


